Showing posts with label Games Workshop. Show all posts

Tuesday, 4 June 2024

Dwarves from "back in the day"


Sometime in the early 90's I bought a couple of packs of dwarves to crew my dwarf juggernaut which for such a hefty lump of a war machine was woefully under crewed and ridiculously under gunned. I went for a set of crossbow armed dwarves which seemed a good idea and a set of random fighters in the hope that there'd be something interesting to add to the mix. Unfortunately the dwarves proved a little too chunky to fit comfortably on the deck of the juggernaut so they got based up as normal and saw limited use as allies to my Bretonnians that I went on to collect. 

As time went by some of the fighters got slight repaints and one of them got converted to a standard bearer (far right with sword and shield). This was long before I acquired the much fabled "pin vice" which to my mind probably looked like a miniature bench vice which was my only point of reference. So, any holes that needed to be drilled were done by hammering a drawing pin into the metal and in this case through the dwarf's fist. Fixed Hawkmoon's broken ankles that way too. 

Anyway, the years passed by and in the early 2000's when I was painting for Foundry I repainted two of the fighters to sell. The first (centre with cleaver) I think I hassled Steve Dean into selling for me as I had no idea how to sell anything. He directed me shortly after to Ebay which is where I sold the second (far left with axe and shield) for probably less than a tenner and developed a buying addiction that has blighted my finances ever since. The remaining models remained rattling around in various boxes until last year.

What I'd been doing for possibly two years was focusing on painting models I'd owned "back in the day" to get some of the more meaningful figures in my collection repainted. These are after all models that date back to my formative years of collecting and painting, and gaming. As such I decided to give these two sets of dwarves a new lease of life. Years ago I acquired a duplicate of my mangled standard bearer model so I replaced that one (still have my original) and the other two of course had to be sourced on Ebay for the sake of completion. Not the highest of priorities in life, but they were! Lead addict thinking.


When it came to painting the models I carried on with the idea I'd been following for a little while at the time which was to use my old colour schemes as inspiration, or at least what I could remember anyway. The crossbow dwarves were probably originally inspired by Wayne England's dwarves from White Dwarf which were blue and white. Although it's always possible my colour choices may have pre-dated seeing that article. I'm not sure anymore. The fighters colours mostly stuck in my memory. The two that are mostly metallics were a no brainer in general. Matched the beard colours and then it was just the shields to figure out. I don't recall what I first did with them but they did get replaced with the plain wooden shields from the fantasy regiments box which I did in purple and white halves. I didn't want to follow those colours though so decided on different designs for each. Red tabard dwarf and cleaver wielding hero were colour schemes that stuck in my memory ever since so were easy to reproduce. The shield design is a crude homemade decal overpainted. The only one I struggled with was the pistol firing dwarf. I remembered painting him in the purple and white scheme but was sure that was a repaint. Had a vague feeling I might have originally done him in yellow but may have been confusing that with a pic from a rule book or White Dwarf. Either way the yellow won and his shield is also an overpainted decal.

So there we are, ten dwarves renewed, painted mostly in the colours a younger me chose but to a standard I could never have achieved at the time. At some point I'll re-do more of the dwarves I had. The Marauder giant slayers are very tempting but also the war machines, the goblobber and Marauder artillery pieces.

Tuesday, 21 May 2024

Pre-slotta skeletons


Sticking with the undead theme, some pre-slotta skeletons. I was strictly just painting models I had back in the day but really fancied getting a few of these done. They were prepped and undercoated anyway and it helps to clear the black pile (my undercoat colour of choice). 

Originally I was never too bothered by the pre-slotta stuff. It was before my time so I was never too familiar with those ranges apart from some of the images in the good old Heroes for Wargames book I picked up in the early 90's. I took a bit more notice when people started painting up their old models and giving them a new lease of life. Finally took the plunge and picked up a handful of skeletons some years back now. There are some fantastic models from this era and these skeletons in particular I think are among the best.

It was nice to do some armoured models after the bare bones plastics and getting to add a bit of colour was also a pleasant change. Initially I was stumped by the shields. They didn't seem to suit the bare wood of the ones I did on my plastics, and cheesy nightmare iconography whilst fun would have been out of place to my mind. I kept thinking of the skeletons in Skyrim and had the idea of these models being ancient warriors so I looked up Roman shield designs and anything related that might be suggested. Tried to keep it fairly simple and these worked out quite nicely. I eschewed my dodgy homemade transfer paint by numbers technique and freehanded these.

I've got a couple more undead on the go and two more painted models that I'll show later. Anyone following my posts on Facebook will know one of the models (bit of a rescue job) and that might hint at what the other three are. ;-)


Wednesday, 27 March 2024

Skeleton horde plastics. A little necromancy.


Some old Skeleton Horde plastics I fancied painting up. Put these together a couple of years ago I think so it was about time they got a lick of paint. Got another five to do at some point. Not much remains of my original skeleton horde set. Poor storage, teenage conversions and the occasional bit of wanton destruction saw my 24 figures turn into a mere handful of models most of which were broken. I did pick up a largely complete Skeleton Army boxed set on Ebay though in later years. I dug out all the broken models and loose bits and decided to see how many I could piece together and fix up. Managed to assemble the ten without having to clip anything from the full sprues. Quite a few needed leg surgery so lots of broken models got chopped up and cobbled together. Something of an act of necromancy you could say.

Thursday, 24 June 2021

Imperial Fists Space Marine command

In a previous post I showed off my old Imperial Fists marines and I think I included a WIP of a lieutenant I'd started with more than a ten year gap between the two. I'd had other command and specialists prepped and ready to go for years so I pushed on and got all five figures done. 

Lieutenant

 
Chaplain

 
Librarian


Medic


Techmarine

There we go. Just a quick post this time as the last one had too much waffle in it.


Friday, 2 November 2018

Genestealer coven


This was a small commission that I couldn't resist posting about because I really like all things genestealer. My own history with these chitinous, egg laying, hybrid making nasties goes all the way back to the release of the 1st edition of Space Hulk. Loved the idea of covens and cults as shown in the army lists in White Dwarf at the time as well. I had a couple of the metal hybrids and the running patriarch but that was it outside of the numerous plastics. Much later on I picked up the seated patriarch somewhere online for a real bargain by todays standards and then some years back I went on a little collecting spree and grabbed a handful of hybrids and more metal purestrains than I really should have. Of course my genestealers are sitting unpainted and gathering dust like most of my 'projects'. Adding to that are the new generation of models acquired through 3rd edition Space Hulk and Deathwatch Overkill.

For this commission I was asked to follow the original studio paint jobs. I tweaked a few things as the original colour schemes are a little garish in retrospect but I think these are pretty true to those classic paint jobs. The last time I painted a genestealer I was a teenager and it was the early 90's. Very few of my old paint jobs exist but there are a couple of plastic genestealers kicking around from those early days and I took a quick snap of three generations of painting.


On the left is one of my earliest attempts. Base coats, ink washes and drybrushing as prescribed in the pages of White Dwarf at the time. This could be from 1989, I forget when exactly I started painting these models. It would have originally been based on a metal gauze topped slotta for Space Hulk.

The middle model is from anywhere between 1990 and 1993 I reckon. This is where I discovered layering thanks to picking up a copy of Heroes for Wargames whilst on holiday. A much more sophisticated finish although still showing my lack of experience. This may have been a repaint of one of the wash and drybrush models.

Of course the one on the right is modern day with a fair bit more experience and ability behind it.

Anyway, enough rambling and rose tinted nonsense, onto the pics:

The big guy, the patriarch and magus advisor. A lot of work went into this as might be expected. A little daunting at first, especially the throne but once the base coats were on it really wasn't as scary as first thought.


A trio of magus's, magi, mag... whatever. I have to two Jes Goodwin models but not the Bob Olley sculpt. Always though there were three Bob Olley sculpts but it seems there are only two (the other having a staff)!


The classic hybrids.


And finally the purestrains, the worlds most awkward models to photograph (bloody arms in the way!).


That's it, next post should be on something I've painted for myself all being well.

Monday, 27 August 2018

Bretonnian standard bearer - revisited!

More shameless copy and pasting from my Facebook page because it's late and I can't be arsed to rewrite everything. There are two posts cobbled together here so let's get into it:

PART ONE

Anybody remember this chap?


I must have painted him a couple of years ago as part of my Bretonnian foot knight command but I never got around to painting the banner. I hate painting banners as I find it awkward in comparison to painting figures. Anyway, having decided to move onto getting some more fantasy stuff painted I thought I'd better try and finish this off and fill that empty slot in my unit.

Just base coats at the moment but thought I'd show how I've got a nice clean edge to the quarters. I use Scotch Magic Tape to mask the area. It's easy to tear by hand and isn't horribly sticky which means it's great for masking. I made sure to press the tape down hard along the edge to be painted to avoid it bleeding under. Got to make sure the painted areas are good and dry though as they can still lift off when removing the tape. It makes the process quite slow going and only once did I have to retouch a small area that peeled after not following my own advice. Make sure the paint isn't too watery to also help reduce the chance of it bleeding through but don't apply it too thickly either or you'll leave a ridge when the tape comes off.


I'll shape the banner before I highlight it. It's a piece of sheet metal (tomato puree tube) and the paint copes perfectly well with the flexing. Then I'll have to print off some decals for the lions and go through all that rigmarole. This might all get done fairly quickly or it could take a while, I've no idea but I am going to get it finished this time.

PART TWO

I'm slowly progressing with my Bretonnian foot knight standard bearer. I needed a little decoration to pop on the end of the flag pole so I decided to replicate the fleur-de-lis that I used on another Bretonnian standard.

This is the green stuff press mould that I made a few years ago. The original part was cut from a 5th edition Bretonnian standard. I used a mix of green stuff and Milliput white in the mould. A little cooking oil stops the putty sticking.
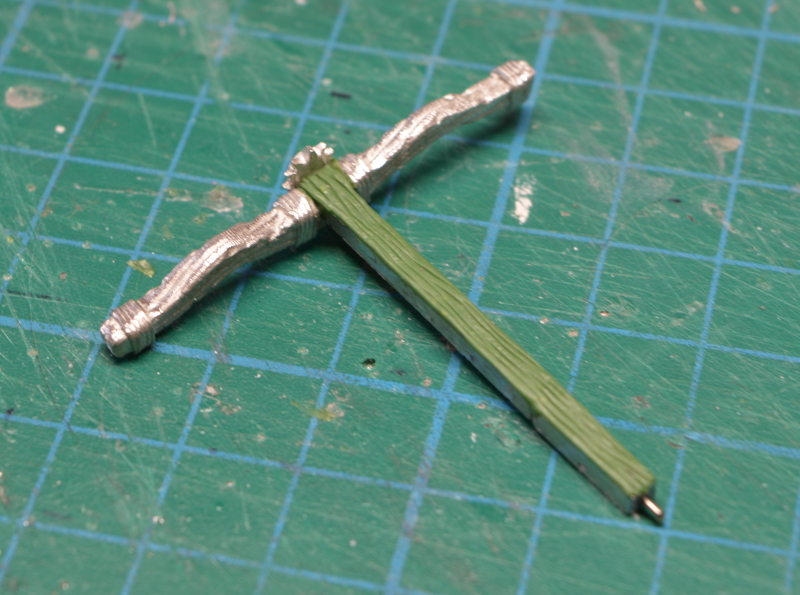


Once dry pop it out of the mould and clean up the flash. It's not a bad reproduction. If I'd used just Milliput I could have filed the edges a bit sharper but it'll look fine once painted up.


There's a quick snap of a little of the painting I've been doing on the flag too. Unfortunately the highlighting and shading that should give some added shape to the flag is completely washed out in the photo. But it's evidence that I've not dumped it in favour of doing something easier again. Still need to work on the front of the flag before printing off some lion rampant decals.

Thursday, 1 March 2018

Stormcast Eternals Lord Relictor

Quick post to show my finished Stormcast Eternals Lord Relictor. I started painting this last year when I was on a bit of roll after finishing up a little unit of Liberators. Did pretty well with the main body of the model and was looking to have it done before Christmas with hopes of getting another hero done too. Weeeeeelllll... that went to shit didn't it! I got a little bogged down working on the relic icon thing and then commission stuff kind of burned me out a bit and killed my desire to paint anything. A couple of weeks back I finally managed to force myself to get it finished off. Chuffed to have it done at last and I'm hoping to tackle another soon.


Tuesday, 20 February 2018

Empire War Wagon

Got the chance to paint up a nice bit of Warhammer history in the classic Empire war wagon. At the time of it's original release I was drifting away from GW, or at least what GW was becoming and I had mixed feelings about the new Empire range. On the one hand I kind of liked some of the models but they were also quite different in style from the classic 80's stuff and were synonymous with a changing GW (at least for me). The war wagon I didn't care for at all though. I thought it was a dumb idea, simple as that. Years down the line though I'm over all that knee jerk bull shit and I've grown to like a lot of what I wasn't keen on.


Being an older model and a metal casting the wagon itself didn't quite fit together perfectly. It's lacking a few right angles I think but thankfully it's not noticeable and the model sits properly. From the underside though that slight skewing can be seen and needed some gap filling to secure the floor. The only real problem was one of the end pieces of the lower structure was too misplaced and needed some trimming and filling to be able to get it into place. Whilst prepping the model I also discovered it was missing the yoke to attach the horses. A replacement couldn't be found so I cobbled one together from a piece from a beastman chariot, some metal sprue and a Grey Knight icon. I had to skin the beam with greenstuff and texture it to match as best I could. Never done that before and I'm quite pleased with the end result.


Fitting the crew in place was easier said than done. It's quite a squeeze in there and later I realised that on the studio model from the box art the crew appear to be sitting slightly higher up so they may have been mounted on an extra bit base. Got them all in though and drilled holes to pin them prior to painting which proved to be a really sensible decision.

Painting the crew and horses was nothing out of the ordinary. Base coating them all certainly took a while, especially with all those puffed and slashed sleeves. I had hoped to get the horses done a bit quicker but they proved to be a little more work due to their coloured armour. The freehand designs are semi-cheated. The shields are totally freehand but he crosses are overpainted decals I had printed out for something else. They were actually Maltese crosses or something so I painted over them to turn them into something a bit more Germanic.


The wagon was a bit daunting at first, it's a hell of a lump and not something I've painted a lot of but it's just timber and bits so I settled into it pretty quickly. In some ways it came together quicker than expected. These things can drag on a bit and become real bug bears but the lower section of the wagon painted up in good time. The upper portion of the structure though took a bit longer. The coloured shingles got a bit annoying after a while and the timbering took longer than hoped. I think largely a result of the model being awkward to handle at that point and I really wish I'd left off the yoke until the end as it just got in the way.


I was going to leave the crew loose for ease of packing the model for posting back to the owner but I ended up gluing them as they were really difficult to fit without damaging the paint work. Went with an epoxy glue rather than superglue just to ensure a solid join.